Battery switch on travel trailer function is crucial for managing your RV’s power. Understanding how to use your battery switch correctly ensures safe and efficient power distribution, preventing costly damage and frustrating breakdowns. This guide breaks down the different types of switches, their operation, troubleshooting common issues, and vital safety precautions to keep your travel trailer running smoothly.
We’ll cover everything from safely connecting and disconnecting batteries to integrating your switch with other power management systems like solar panels and inverters. Learn how to maximize battery life, prioritize power sources, and avoid common mistakes that can lead to electrical problems. By the end, you’ll be confident in your ability to manage your travel trailer’s power system with ease and safety.
Battery Switch Types in Travel Trailers
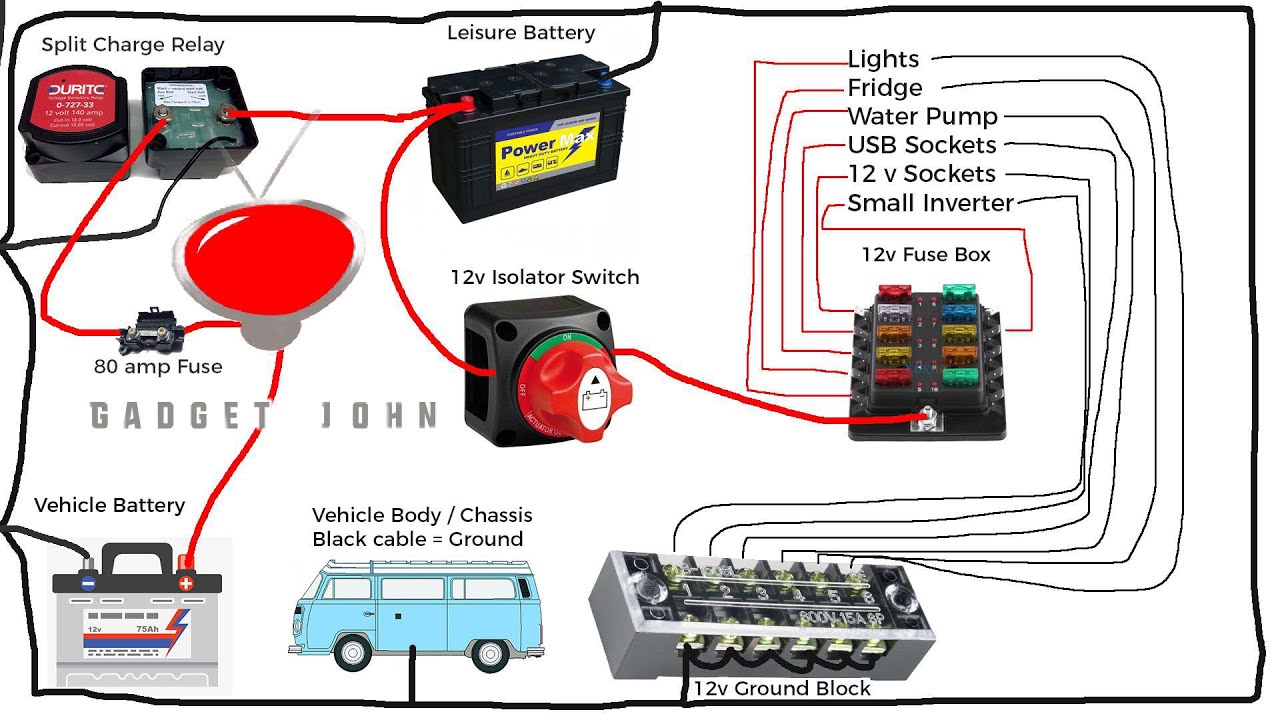
Choosing the right battery switch for your travel trailer is crucial for managing your power systems effectively and safely. Different types offer varying levels of control and protection. Understanding their functions and limitations will help you select the best option for your needs.
Single-Pole Battery Switches
A single-pole battery switch is the simplest type. It controls the power flow from a single battery source to the trailer’s electrical system. This means you can either connect the battery to the trailer’s circuits or disconnect it completely. Think of it as a simple on/off switch for your battery. They’re inexpensive and easy to install, making them a popular choice for smaller trailers with simpler electrical systems.
However, they offer limited control; you can’t easily switch between different battery banks or isolate parts of the electrical system.
Double-Pole Battery Switches
Double-pole switches offer more control than single-pole switches. They allow you to disconnect both the positive and negative terminals of your battery simultaneously, providing better safety. This is important because disconnecting only one terminal can still leave a risk of short circuits. Double-pole switches are often preferred for their increased safety features, although they still only manage one battery source.
Double-Throw Battery Switches
Double-throw switches provide the most control and flexibility. These switches allow you to switch between two different battery sources (like a house battery and a starting battery) or connect both to the trailer’s system simultaneously. This is especially useful for trailers with multiple batteries, allowing you to use one for house power and another for starting the engine. You can also disconnect both batteries completely for added safety.
This setup enhances your ability to manage power consumption and prevent accidental drain.
Comparison of Battery Switch Types
| Feature | Single-Pole | Double-Pole | Double-Throw |
|---|---|---|---|
| Number of Batteries Controlled | One | One | Two (or more with added components) |
| Safety Features | Basic | Improved (disconnects both poles) | Improved (disconnects both poles; selective switching) |
| Flexibility | Low | Low | High |
| Cost | Low | Moderate | High |
| Application Suitability | Small trailers, simple systems | Most trailers, prioritizing safety | Large trailers, multiple battery systems |
Connecting and Disconnecting Batteries
Connecting and disconnecting your travel trailer batteries safely is crucial for preventing damage to your electrical system and avoiding personal injury. This process involves understanding your battery switch and following a methodical approach. Always prioritize safety – a little extra caution goes a long way.Properly connecting and disconnecting your batteries using a battery switch ensures the longevity of your batteries and the safety of your electrical system.
Improper handling can lead to sparks, corrosion, and even battery explosions. Remember, battery acid is corrosive, so protective gear is essential.
Battery Switch Operation
Using a battery switch to manage your trailer’s power is straightforward. Most switches have positions for “Both,” “House,” “Off,” and “Chassis.” The “Both” position connects both the house and chassis batteries; “House” connects only the house batteries; “Off” disconnects both; and “Chassis” connects only the chassis battery. Before manipulating the switch, always ensure you understand the position of each setting.
Isolating House Batteries from the Chassis Battery
To isolate your house batteries from the chassis battery, simply turn the battery switch to the “House” position. This will disconnect the house batteries from the chassis battery and any connected loads, preventing unwanted drain on your house batteries when the trailer isn’t in use. To reconnect, simply switch to the “Both” position. Before doing so, confirm all connected devices are functioning as expected.
Preventing Accidental Short Circuits
Accidental short circuits can occur during battery connection or disconnection. To prevent this, always disconnect any loads (lights, appliances, etc.) before disconnecting batteries or changing the battery switch position. Make sure your tools and hands are clean and dry, as moisture can conduct electricity and cause a short. When working with batteries, always ensure that the positive (+) and negative (-) terminals are never accidentally touching each other or any conductive material.
A simple tool like a non-conductive wrench handle can help to prevent accidental contact.
So, you’re wondering about that battery switch in your travel trailer? It’s super important! Check out this helpful guide on the battery switch on travel trailer function to understand its purpose. Knowing how to use it properly will save you headaches (and potentially a dead battery!). For a more in-depth look at different scenarios and troubleshooting, this other article on the battery switch on travel trailer function is a great resource.
Mastering this simple switch will make your RV adventures way smoother.
Using Appropriate Safety Equipment
Always wear appropriate safety equipment when working with batteries. This includes safety glasses or goggles to protect your eyes from splashes of battery acid, and rubber gloves to protect your hands from corrosion and acid burns. Consider using insulated tools as well. Working in a well-ventilated area is also advisable, as battery fumes can be harmful. If you are unsure about any aspect of the process, consult a qualified RV technician.
Troubleshooting Battery Switch Issues: Battery Switch On Travel Trailer Function
Dealing with a malfunctioning battery switch in your travel trailer can be frustrating, but understanding the common causes and troubleshooting steps can save you time and potential headaches. This section will guide you through identifying problems, performing repairs, and implementing preventative maintenance.
Battery switch problems often stem from simple issues, easily resolved with basic tools and a bit of know-how. More complex problems might require professional assistance, but a methodical approach will help you diagnose the issue and determine the best course of action.
Common Battery Switch Problems, Battery switch on travel trailer function
Common problems with travel trailer battery switches include corrosion on the terminals, loose connections, and faulty switches themselves. Corrosion builds up over time due to exposure to the elements and battery acid. Loose connections can occur from vibrations during travel or simply from age and wear. A faulty switch might be internally damaged, preventing proper electrical flow. Identifying the specific problem is the first step to effective troubleshooting.
Troubleshooting a Non-Functioning Battery Switch
A systematic approach is key to effectively troubleshooting a non-functioning battery switch. Begin by visually inspecting the switch and its connections. Look for signs of corrosion – a white, green, or blue powdery substance on the terminals or connectors. Check for loose connections; ensure all wires are securely fastened and that the switch itself is firmly mounted. If corrosion is present, proceed to cleaning and maintenance (detailed below).
Okay, so you’re wondering about that battery switch in your travel trailer? It’s super important! Check out this helpful guide on the battery switch on travel trailer function to understand how it works. Knowing how to use it properly prevents dead batteries and keeps your lights and appliances running smoothly. For a more in-depth look at troubleshooting and maintenance, another great resource is this article on the battery switch on travel trailer function – it covers everything from basic operation to more advanced tips.
Seriously, understanding this switch is key to a happy and power-filled RV experience!
If connections appear loose, tighten them carefully. If the switch still doesn’t function correctly after these steps, the switch itself might be faulty and require replacement.
Troubleshooting Flowchart
This flowchart Artikels the steps to diagnose a malfunctioning battery switch:
Start → Inspect for Corrosion → (Yes) → Clean Connections → Test Switch → (Working?) → (Yes) → End → (No) → Replace Switch → End
(No) → Inspect for Loose Connections → (Yes) → Tighten Connections → Test Switch → (Working?) → (Yes) → End → (No) → Replace Switch → End
Cleaning and Maintaining Battery Switch Connections
Proper cleaning and maintenance are crucial to prevent future problems. Begin by disconnecting the battery’s negative terminal to prevent accidental shorts. Use a wire brush or a battery terminal cleaner to remove corrosion from the switch terminals and battery posts. Apply a dielectric grease to the cleaned terminals to prevent future corrosion. Ensure all connections are tight after cleaning and reconnecting the battery.
Regularly inspect your battery switch for signs of corrosion or loose connections, especially before and after long storage periods. A simple visual inspection can prevent major problems down the road.
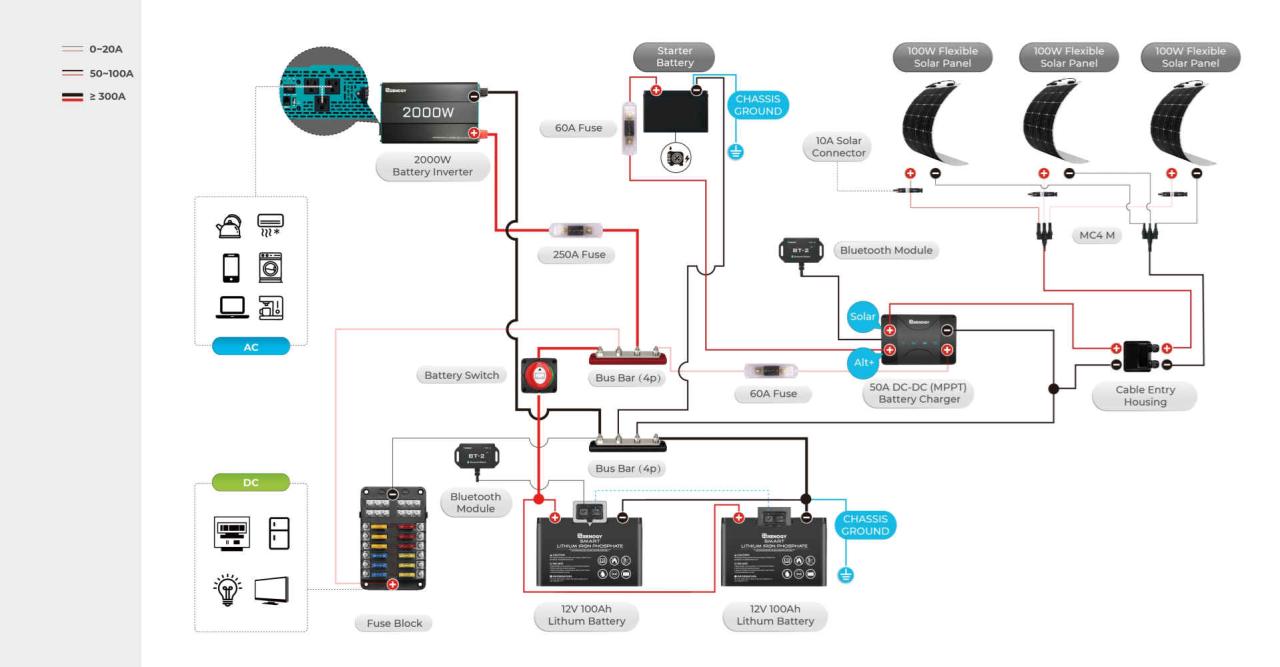
Battery Switch and Power Management Systems
Your travel trailer’s battery switch is a crucial part of its overall power management system, working in concert with other components to ensure efficient and reliable power delivery. Understanding how it interacts with these other systems is key to maximizing your battery life and avoiding frustrating power outages.The battery switch acts as a central control point, directing power flow between your batteries, shore power (hookups at campsites), and a generator.
It prevents unwanted battery drain by isolating the batteries when not needed, extending their lifespan and saving you money on replacements. This control is particularly important when you’re not connected to shore power or using your generator.
Battery Switch Interaction with Other Power System Components
The battery switch works closely with solar panels, inverters, and converters. Solar panels charge your batteries; the battery switch controls whether this charge goes directly to the batteries or also feeds into your trailer’s electrical system. The inverter converts DC power from your batteries to AC power for appliances requiring it, while the converter transforms AC power from shore power or a generator to DC power for charging batteries and powering 12-volt systems.
The battery switch determines when the batteries are the primary power source for the inverter, and whether the converter is charging the batteries. Imagine a scenario where your solar panels are charging your batteries, and you’re simultaneously using shore power. The battery switch ensures that the solar power isn’t unnecessarily overloading the system and that the batteries are receiving optimal charging.
Battery Switch’s Role in Preventing Battery Drain and Maximizing Battery Life
The primary function of the battery switch is to isolate the house batteries from the rest of the trailer’s electrical system when not needed. This prevents parasitic drain, which is the slow but steady depletion of battery power even when your trailer isn’t in use. Parasitic drain is caused by small amounts of current drawn by devices in standby mode, like clocks or smoke detectors.
By switching off the batteries, you prevent this drain and extend the battery life significantly. For example, if you’re leaving your trailer for an extended period, turning the battery switch to the “off” position will prevent your batteries from completely discharging.
Prioritizing Power Sources Using the Battery Switch
The battery switch allows you to prioritize different power sources based on your needs and availability. If you’re connected to shore power, you might want to use that as the primary power source and allow the converter to charge the batteries. The battery switch facilitates this by directing power from the shore power to the converter and the house system, while also allowing the batteries to receive a charge.
If you’re off-grid, you can prioritize your generator or your batteries. If you’re using your generator, you can use the battery switch to charge the batteries from the generator’s output while powering your trailer’s appliances. When using batteries as your primary power source, the switch ensures that they are the only source powering your trailer’s systems.
Power Management Scenarios and Battery Switch Function
Several common scenarios illustrate the battery switch’s importance.
- Scenario 1: Connected to Shore Power: The battery switch allows shore power to feed the trailer’s systems and simultaneously charge the batteries via the converter. Batteries are used only if shore power fails.
- Scenario 2: Using a Generator: The battery switch allows the generator to power the trailer and simultaneously charge the batteries. Batteries provide backup power if the generator is turned off.
- Scenario 3: Off-Grid with Solar Panels: The battery switch directs power from solar panels to charge the batteries. The batteries then power the trailer’s systems through the inverter. The switch isolates the batteries when not needed, preventing drain.
- Scenario 4: Boondocking (no external power): The battery switch isolates the batteries to prevent unnecessary drain when not in use. When needed, the switch directs power from the batteries to the inverter, which then supplies power to the trailer’s appliances.
Mastering your travel trailer’s battery switch is key to a worry-free RV experience. By understanding the different switch types, safe operating procedures, and troubleshooting techniques, you’ll be well-equipped to handle any power situation. Remember regular inspection and maintenance are essential for preventing issues and ensuring the longevity of your system. Safe travels!
Question Bank
What happens if I leave my battery switch on all the time?
Leaving your battery switch on constantly can lead to parasitic drain, slowly depleting your batteries even when not using the trailer. This can leave you with a dead battery when you next need it.
How often should I check my battery switch connections?
Inspect your battery switch connections at least once a season, or more frequently if you notice any unusual behavior or corrosion. Look for loose connections, corrosion, or any signs of damage.
Can I use any type of battery switch in my travel trailer?
No, the appropriate battery switch depends on your trailer’s electrical system and the number of batteries. Using the incorrect switch can be dangerous and may not function properly. Consult your owner’s manual or a qualified RV technician.
My battery switch is making a clicking sound. What does that mean?
A clicking sound often indicates a loose connection or a faulty switch. Check all connections for tightness and corrosion. If the problem persists, the switch may need replacement.
